Automated Mobile App Testing Farm
Project Scope
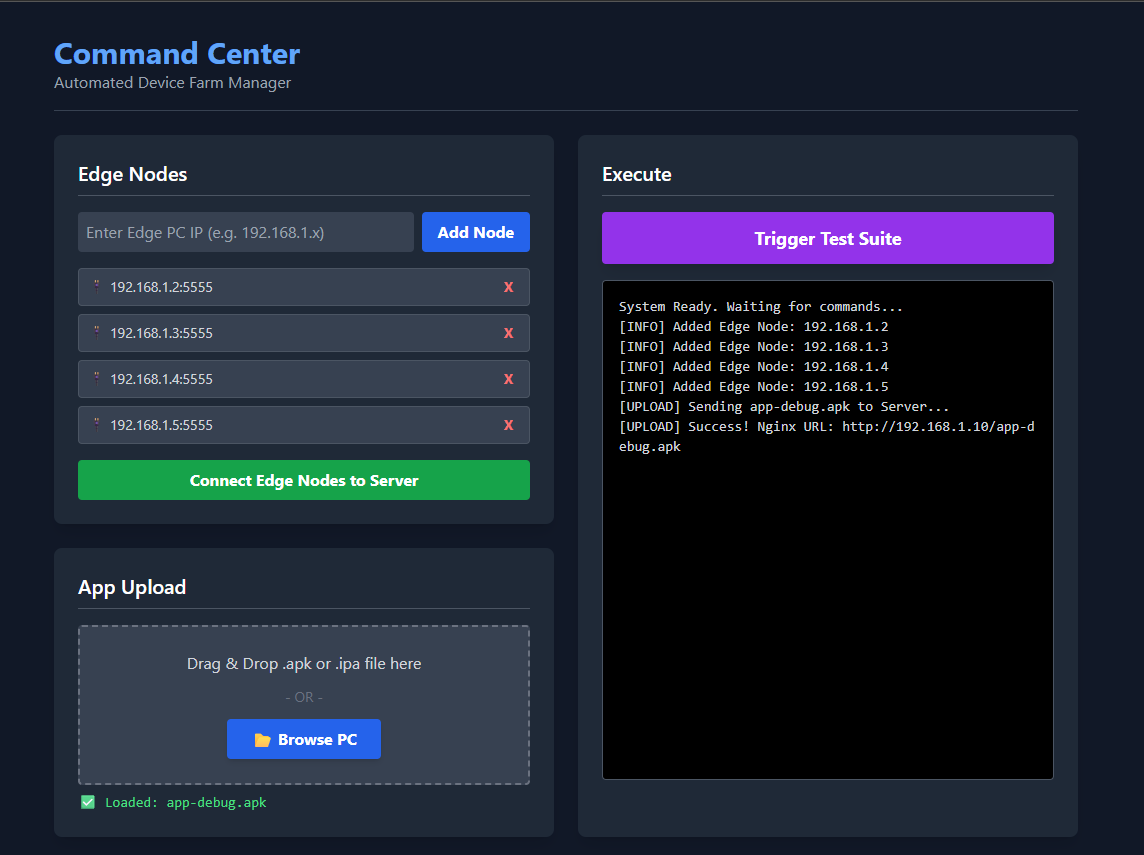
I built a custom, self-hosted testing farm to run mobile app tests across multiple physical devices at the same time. Instead of tying up a developer’s local machine, anyone on the network can use the central web dashboard to upload an app, trigger a test suite, and get automated results back in minutes.
The Challenge
Building a local device farm to run parallel tests sounds straightforward until you hit the physical limits of a single machine. Trying to run a fleet of physical phones off of one computer causes some major hardware and software headaches:
- USB Endpoint Limits: A standard motherboard can only handle so many USB endpoints at once. If you try to plug 10+ phones into one PC, the USB controller usually crashes, causing constant disconnects.
- Wireless Instability: Trying to bypass the physical USB limit by using ADB over Wi-Fi is just too unreliable. Wireless debugging drops packets frequently, which breaks the automated testing queues since they need a constant, stable connection to run correctly.
Technical Implementation
Node-Based Architecture
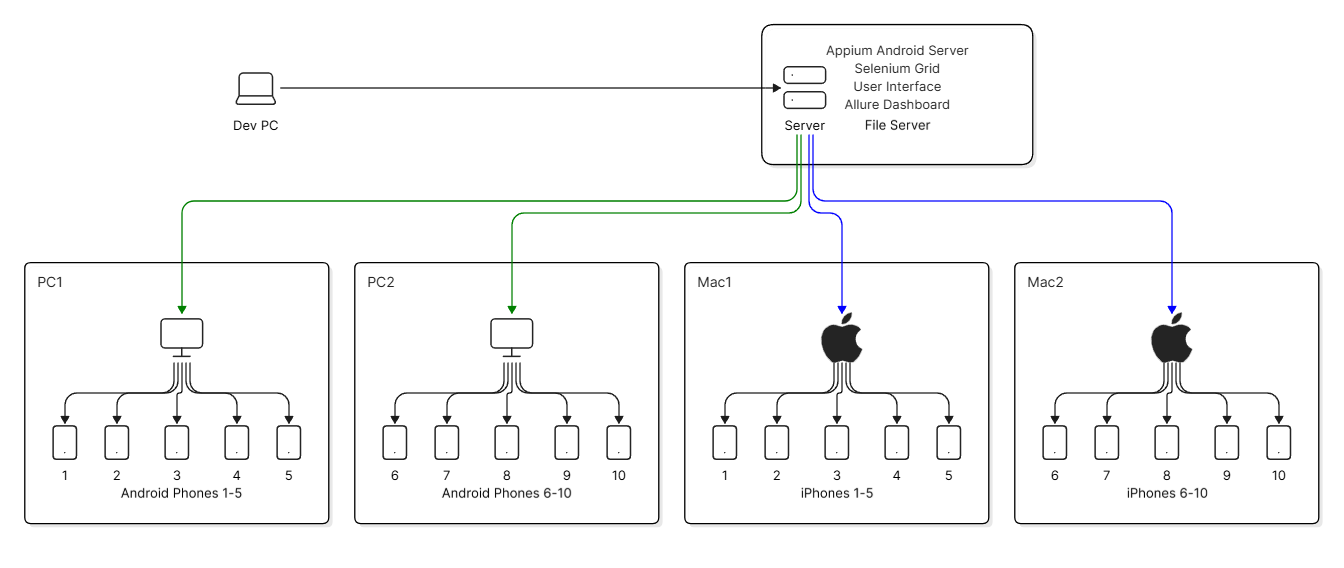
To get around the USB limits and stability issues, I split the system up. The farm uses a node-based architecture that makes it super easy to expand.
- Master Node: The main server runs on Proxmox, with the core services deployed inside lightweight Linux containers (LXC). It hosts the FastAPI web dashboard, stores the app files (APKs/IPAs), runs the actual Appium drivers, and figures out where to route the tests.
- Edge Nodes: Because the heavy lifting is done by the main server, the edge nodes can be cheap, low-powered PCs. They just need to connect to the network, run ADB, and open a port for the main server to talk to. Each PC manages a small, stable group of hardwired phones.
- Easy to Expand: If I need to add more phones, I can just plug another PC into the network and type its IP address into the central UI. Once the node is added, the system automatically detects all the physical phones plugged into it and starts sending tests their way without needing any code changes.
Ecosystem-Specific Routing & Flutter
While the current setup is heavily optimized for native Android applications, the underlying architecture is framework-agnostic. By simply adjusting the Appium desired capabilities, the farm natively supports and executes Flutter applications out of the box.
However, iOS and Android require fundamentally different routing logic:
- Android (Lightweight Edge): Android’s open ecosystem allows the edge PCs to act as simple network bridges. They just expose an ADB port, and the Master Node handles all the heavy Appium processing.
- Apple (Heavy Edge): Apple’s strict security sandboxing means iOS tests require Xcode to compile and sign the
WebDriverAgent. To support iPhones, Mac Minis are dropped onto the network to act as “heavy” edge nodes, hosting the Appium servers locally while the Master Node simply acts as the traffic director.
Test Execution with Pytest
The actual testing logic is written in Python using pytest. To make the tests hardware-agnostic, the system utilizes Pytest fixtures. When a test suite is triggered, the developer doesn’t need to know which phones are plugged in. The Master Node uses pytest-xdist to slice the test matrix, dynamically grabbing an available device IP from the active pool and injecting it into the Pytest fixture at runtime.
==========================================
TEST CASE: MATERIAL COST CALCULATION
Verifies dynamic pricing output format for 16 Gauge steel
==========================================
import re
from appium.webdriver.common.appiumby import AppiumBy
from selenium.webdriver.support.ui import WebDriverWait
from selenium.webdriver.support import expected_conditions as EC

def test_sixteen_gauge_calculation_format(driver):
"""Verifies calculation output format for 16 Gauge materials."""

# Initialize explicit wait
wait = WebDriverWait(driver, 10)

# 1. Authenticate via Google Sign-In (Handling SSO overlay)
wait.until(EC.element_to_be_clickable((AppiumBy.XPATH, "//android.widget.Button[@text='Sign in']"))).click()
wait.until(EC.element_to_be_clickable((AppiumBy.XPATH, "//android.support.v7.widget.RecyclerView[@resource-id='com.google.android.gms:id/list']/android.widget.LinearLayout[1]"))).click()

# 2. Input Material Dimensions (Length x Width)
length_input = wait.until(EC.visibility_of_element_located((AppiumBy.ID, "com.example.costcut2:id/steelLengthEditText")))
length_input.clear()
length_input.send_keys("24")

width_input = driver.find_element(AppiumBy.ID, "com.example.costcut2:id/steelWidthEditText")
width_input.clear()
width_input.send_keys("12")

# 3. Select Material Gauge
dropdown_box = driver.find_element(AppiumBy.ID, "com.example.costcut2:id/thicknessDropDown")
dropdown_box.clear()
dropdown_box.send_keys("16 Gauge")

# 4. Execute Calculation
# Explicitly waiting for button to be clickable after dropdown UI settles
calc_button = wait.until(EC.element_to_be_clickable((AppiumBy.ID, "com.example.costcut2:id/calculateButton")))
calc_button.click()

# 5. Assert Output Formatting
# Explicitly waiting for the TextView to populate dynamically before asserting
result_element = wait.until(EC.visibility_of_element_located((AppiumBy.ID, "com.example.costcut2:id/outputTextView")))
result_text = result_element.text

# Validate the output strictly matches currency format (e.g., "$12.50")
assert re.match(r"^\$\d+\.\d{2}$", result_text), f"Currency format broken. Got: {result_text}"
Test Reporting & Analytics
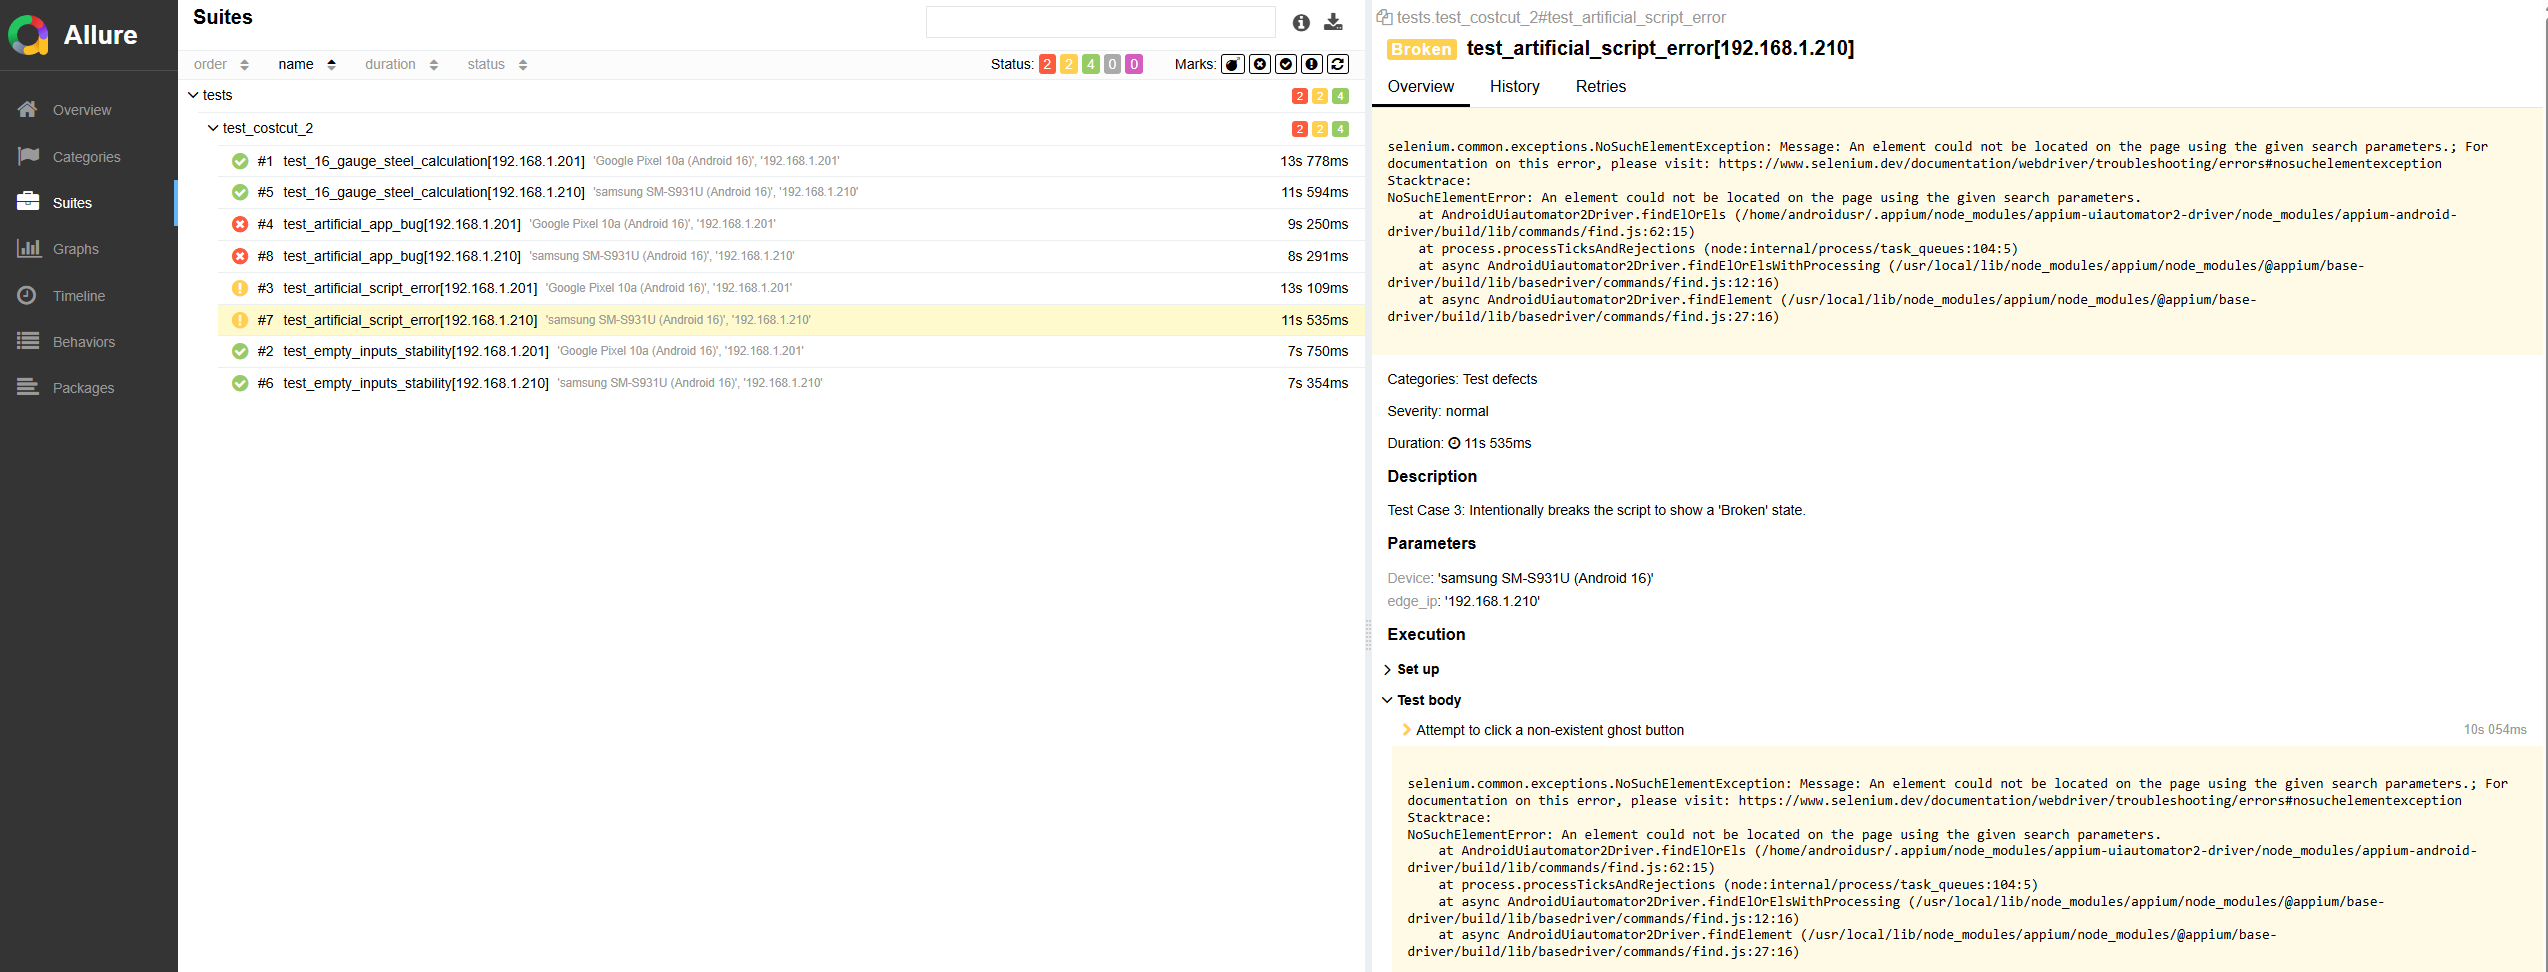
Running tests is only half the battle; you need to actually be able to read the results. To save people from digging through messy console logs, the system automatically generates clean reports.
- Device Details: While the tests run, the system pings the connected phones to pull their exact manufacturer, model, and OS version.
- Automated Reports: An Allure Docker container pulls all the raw test data from the different edge nodes on the network and turns it into an interactive web dashboard.
- Easy Debugging: You can instantly see exactly which tests failed, figure out which specific phone or OS caused the issue, and read the full error logs to fix the bug quickly.
Future Roadmap
I have a few straightforward upgrades planned to make the system easier to use and maintain:
- More In-Depth Dashboard UI: Expanding the FastAPI web interface to show more detailed live-status updates for the connected nodes and devices.
- Streamlined Backend Development: Setting up Docker volumes so I can edit the FastAPI code and see changes update live, rather than having to rebuild the container every time I save a file.
System Demo
Here is a quick video showing the Master Node routing a test suite to an Edge Node, running the tests on two physical Android phones at the exact same time.